Scenery Flats

ABOVE, the parts for five types of Scenery Flats. The top three sets have all the same sized parts. The only difference between them is the glue tab position on the spread. The Angled version on the lower left requires all angles to match, but the angle is not specific. The Multi-Layer version can have as many layers as desired. All of these tests are assembled on video at the bottom of this page.

The assembled Scenery Flats are depicted in the same order as they are laid out in the top photo.
An effective form of pop-up is the Scenery Flat. It is used almost exclusively in several beautifully made published books, including Peter and the Wolf, an example of which is shown on the Visual Style page in this module.
Conceptually, a Scenery Flat is like those movable background panels seen on stage during a play, where a flat wall is brought in to give dimension to the stage. From the audience point of view, there is an illusion of volume, yet the performers can move about freely from side to side behind and in front of the scenery flat.
In a pop-up, Scenery Flats create planes that come forward off of a vertical page (also known as the background). Since a spread contains two pages, one page - say, the right page - remains flat on the table (also known as the floor), while the other page is kept at 90º to the table. This makes the vertical page act as a visual background to the scene, and is the power source for the scenery flat.
NOTE: Support Arm Specs are descrived in detail blow, showing how to determine the length and gluing position on the background surface from a known mounting location on the flats.
Parallel Flats
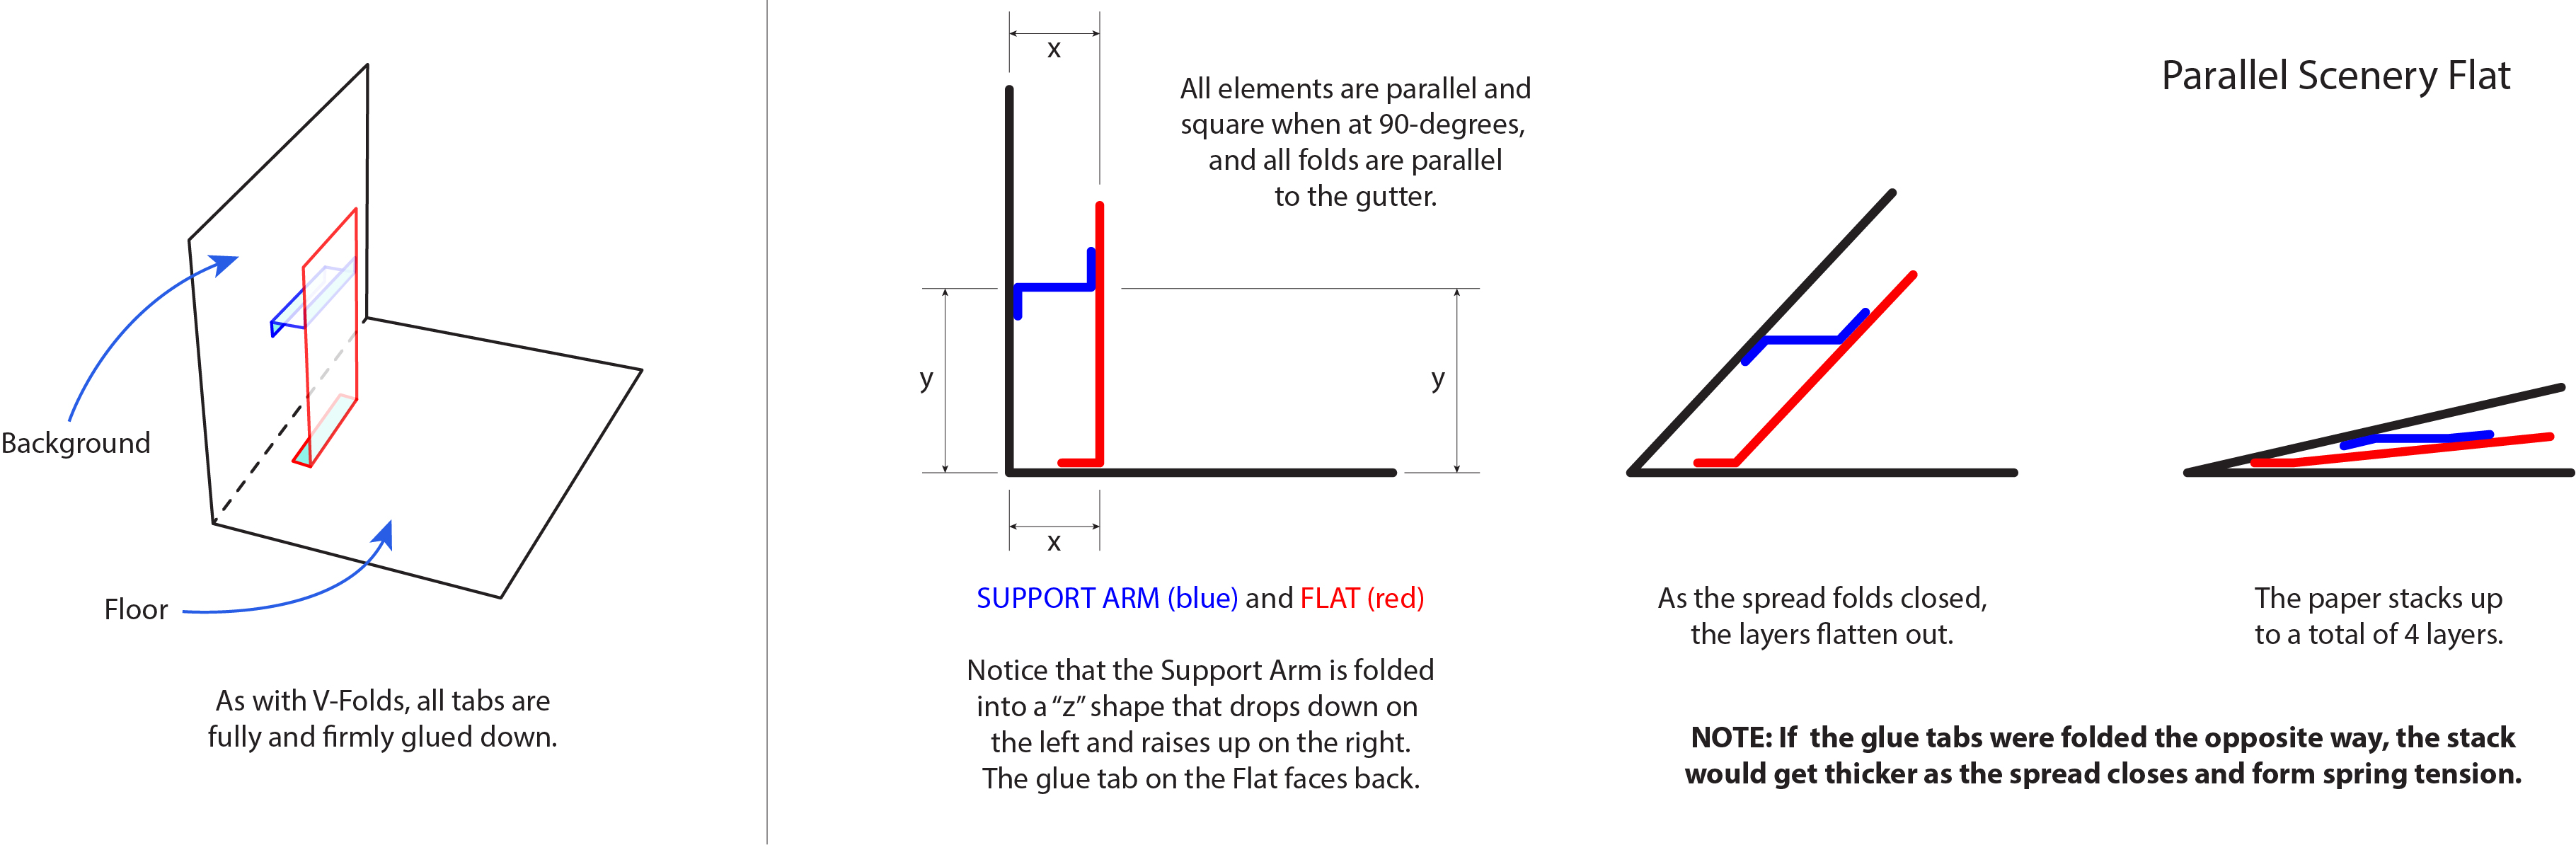
A Parallel Scenery Flat requires that the support arm is as deep as the flat is offset from the gutter. Also, the position where the support arm is attached to the background is at the same height as where it is attached to the flat. And finally, that all attachments on the floor and background are parallel to the gutter. In other words, the flat is parallel to the background and the support arm is parallel to the floor.
This forms a parallelogram between the parts as the book opens and closes. A Parallel Flat allows for a spread to be laid at any angle up to completely open, but has the most depth at 90º. It will have no depth when is fully open or fully closed.
Non-parallel Flats
A special form of Scenery Flat is a Non-Parallel Flat. This can pitch towards or away from the background. If it pitches toward the background it is "obtuse"; away is "acute". The attachment positions for the flat and the support arm on the floor and background remain parallel to the gutter, even though other dimensions are changed. This forms a trapezoid when the spread is at 90º. Otherwise, it forms a trapezium at all other angles (depending upon where you are in the world, trapezoid and trapezium don't always have the same definitions).
Below are two illustrations. The first describes an Acute Non-Parallel Scenery Flat; the second, an Obtuse version. There is a lot of technical information in these illustrations, but in reality it is also possible to simply design by trial and error, while applying the rule of gluing the Support Arm in place when the spread is closed shut.
Another illustration describes how to precisely determine the Support Arm length and attachment position on the background, based upon any chosen mounting location on the Flat. Because of its complexity, This illustration is on its own Pop-Up Techniques page, called SUPPLEMENTAL: Determining Support Arm Specifications.
Acute

Obtuse

Angled Flats

Visualize a Scenery Flat that has its glue tabs angled towards the gutter. In actuality, this scenery flat is the same as a V-Fold that does not reach the gutter. It can be a very shallow or very steep V-Fold. If you do not intend on letting the spread open more than 90º, then it is an angled scenery flat. However, if you do intend on opening it to the full 180º, then it will essentially be an angled tent fold.
The point of the above description is that the name describes intent, not necessarily the construction. One aspect of most scenery flats is that the "flat", or part facing the audience, obscures the support arm. In V-folds and angled tent folds, this is not typical, though possible.
The simplest angled flat is one that has the rise and run of the glue tabs matching. In other words, the pitch angle and distance of both the "flat glue tab" and the "support arm glue tab" are the same, though mirrored, from the gutter.
Multi-Layer Flats

Scenery Flats can be made to layer one in front of the other, giving the effect of volume and depth. For example, there could be a series of mountains that get taller and more distant, a forest full of trees, or a crowd of people, etc. Due to its special construction, multi-layering provides a lot of visual effect without adding undue stress to the mechanism.
As with a normal Scenery Flat, the Support Arm must be glued firmly to the background and the front flat. Each flat that is between those two doesn't get glued to the Support arm at all. Instead, these between-flats contain slots that are sized to allow the arm to pass through freely, yet capture it. The slots are cut tall enough for easy pivoting, and narrower than the width of the Support arm. The Support arm has notches on its edges that fit the slot loosely, but also capture the between flats.
Supporting Videos
31-minute video of scenery flat demonstrations.
1-minute video of secenery flats examples.